

JUnit5 필수 개념 정리 (JAVA)

안녕하세요? 코딩중독입니다.
우테코를 진행하면서 JUnit5를 활용한 단위 테스트를 배우고 있는데, 관련된 JUnit5 문법을 정리하기 위해 포스팅을 작성합니다. 혹시나 미흡하거나 틀린 부분은 댓글로 지적해 주시면 감사하겠습니다.
JUnit5란?
자바 개발자가 많이 사용하는 테스팅 기반 프레임워크를 말합니다. JUnit5은 자바8 이상부터 사용가능하며, JUnit Platform과 JUnit Jupiter, Junit Vintage 결합한 형태라고 보시면 됩니다.
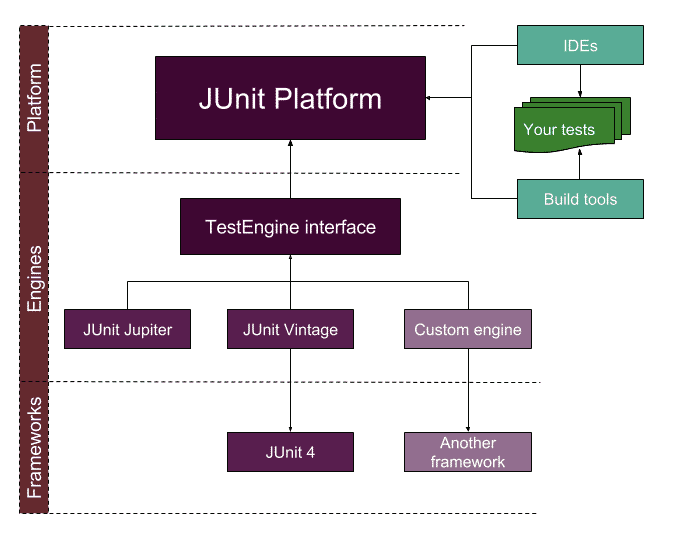
JUnit Platform: 테스트를 실행해주는 런처와 TestEngine API를 제공함.
Jupiter: TestEngine API 구현체로 JUnit5에서 제공함.
Vintage: TestEngine API 구현체로 JUnit3, 4에서 제공함.
JUnit5의 어노테이션(Annotation)
| JUnit5 어노테이션 | 내용 | JUnit4 어노테이션 |
| @Test | 테스트 Method임을 선언함. | @Test |
| @ParameterizedTest | 매개변수를 받는 테스트를 작성할 수 있음. | |
| @RepeatedTest | 반복되는 테스트를 작성할 수 있음. | |
| @TestFactory | @Test로 선언된 정적 테스트가 아닌 동적으로 테스트를 사용함. | |
| @TestInstance | 테스트 클래스의 생명주기를 설정함. | |
| @TestTemplate | 공급자에 의해 여러 번 호출될 수 있도록 설계된 테스트 케이스 템플릿임을 나타냄. | |
| @TestMethodOrder | 테스트 메소드 실행 순서를 구성하는데 사용함. | |
| @DisplayName | 테스트 클래스 또는 메소드의 사용자 정의 이름을 선언할 때 사용함. | |
| @DisplayNameGeneration |
이름 생성기를 선언함. 예를 들어 '_'를 공백 문자로 치환해주는 생성기가 있음. ex ) new_test -> new test |
|
| @BeforeEach | 모든 테스트 실행 전에 실행할 테스트에 사용함. | @Before |
| @AfterEach | 모든 테스트 실행 후에 실행한 테스트에 사용함. | @After |
| @BeforeAll | 현재 클래스를 실행하기 전 제일 먼저 실행할 테스트 작성하는데, static로 선언함. | @BeforeClass |
| @AfterAll | 현재 클래스 종료 후 해당 테스트를 실행하는데, static으로 선언함. | @AfterClass |
| @Nested | 클래스를 정적이 아닌 중첩 테스트 클래스임을 나타냄. | |
| @Tag | 클래스 또는 메소드 레벨에서 태그를 선언할 때 사용함. 이를 메이븐을 사용할 경우 설정에서 테스트를 태그를 인식해 포함하거나 제외시킬 수 있음. | |
| @Disabled | 이 클래스나 테스트를 사용하지 않음을 표시함. | @Ignore |
| @Timeout | 테스트 실행 시간을 선언 후 초과되면 실패하도록 설정함. | |
| @ExtendWith | 확장을 선언적으로 등록할 때 사용함. | |
| @RegisterExtension | 필드를 통해 프로그래밍 방식으로 확장을 등록할 때 사용함. | |
| @TempDir | 필드 주입 또는 매개변수 주입을 통해 임시 디렉토리를 제공하는데 사용함. |
JUnit5의 사용자 정의 어노테이션(Annotation)
JUnit5 jupiter의 어노테이션은 메타 어노테이션으로 사용할 수 있습니다. 예를 들어, @Tag("fast")를 매번 사용하는 대신 @Fast로 대체할 수 있습니다.
(1) Fast Annotation
import java.lang.annotation.ElementType;
import java.lang.annotation.Retention;
import java.lang.annotation.RetentionPolicy;
import java.lang.annotation.Target;

import org.junit.jupiter.api.Tag;

@Target({ ElementType.TYPE, ElementType.METHOD })
@Retention(RetentionPolicy.RUNTIME)
@Tag("fast")
public @interface Fast {
}
(2) Test Method
@Fast
@Test
void myFastTest() {
    // ...
}
또한, @Fast와 @Test를 합친 @FastTest도 선언이 가능합니다.
(3) FastTest Annotation
import java.lang.annotation.ElementType;
import java.lang.annotation.Retention;
import java.lang.annotation.RetentionPolicy;
import java.lang.annotation.Target;

import org.junit.jupiter.api.Tag;
import org.junit.jupiter.api.Test;

@Target(ElementType.METHOD)
@Retention(RetentionPolicy.RUNTIME)
@Tag("fast")
@Test
public @interface FastTest {
}
테스트 클래스와 메소드
테스트 클래스는 하나 이상의 테스트 메소드를 포함하는 최상위 클래스, static 멤버 클래스, 또는 중첩 클래스이어야 합니다. 또한, 테스트 클래스는 추상 클래스로 정의되면 안 되며, 단일 생성자만 가져야 합니다.
이때, 테스트 메소드는 '@Test, @RepeatedTest, @ParameterizedTest, @TestFactory, @TestTemplate' 중 하나의 어노테이션으로 선언된 메소드를 말합니다.
마지막으로, 생명 주기 메소드는 '@BeforeAll, @AfterAll, @BeforeEach, @AfterEach' 중 하나의 어노테이션으로 선언된 메소드를 말합니다.
다만, 테스트 메소드와 생명 주기 메소드는 모두 추상 메소드로 정의되면 안 되며, 값을 반환해서도 안 됩니다. 그리고 두 메소드는 non-static인 인스턴스 메소드이어야 합니다.
아래는 테스트 클래스 및 메소드를 작성한 예시입니다.
import static org.junit.jupiter.api.Assertions.fail;
import static org.junit.jupiter.api.Assumptions.assumeTrue;

import org.junit.jupiter.api.AfterAll;
import org.junit.jupiter.api.AfterEach;
import org.junit.jupiter.api.BeforeAll;
import org.junit.jupiter.api.BeforeEach;
import org.junit.jupiter.api.Disabled;
import org.junit.jupiter.api.Test;

class StandardTests {

    @BeforeAll
    static void initAll() {
    }

    @BeforeEach
    void init() {
    }

    @Test
    void succeedingTest() {
    }

    @Test
    void failingTest() {
        fail("a failing test");
    }

    @Test
    @Disabled("for demonstration purposes")
    void skippedTest() {
        // not executed
    }

    @Test
    void abortedTest() {
        assumeTrue("abc".contains("Z"));
        fail("test should have been aborted");
    }

    @AfterEach
    void tearDown() {
    }

    @AfterAll
    static void tearDownAll() {
    }

}
이 테스트의 실행 순서는 'initAll() -> init() -> succeedingTest() -> testDown() -> init() -> failingTest() -> tearDown() -> init() -> abortedTest() -> tearDown() -> tearDownAll()'이 되는 것을 알 수 있습니다.
JUnit5의 Assertions
JUnit5 Jupiter Assertions 메소드는 모두 static 메소드라는 특징이 있으며, 자세한 모든 메소드는 이곳에서 확인하실 수 있습니다.
저는 자주 사용하는 메소드만 살펴보겠습니다.
(1) 기본
@Test
    void standardAssertions() {
        assertEquals(2, calculator.add(1, 1));
        assertEquals(4, calculator.multiply(2, 2),
                "The optional failure message is now the last parameter");
        assertTrue('a' < 'b', () -> "Assertion messages can be lazily evaluated -- "
                + "to avoid constructing complex messages unnecessarily.");
    }
값을 단순히 비교할 때는 assertEquals()를 사용합니다. 인자를 2개만 사용하면 그 두 개가 같은 값인지 비교하고, 3개를 사용하면 테스트가 실패하였을 경우 3번째 인자를 메시지로 출력해 줍니다. assertTrue()도 같은 맥락으로, 인자를 1개 사용하면 그 식이 true인지 확인하고, 2개를 사용하면 테스트가 실패하였을 경우 2번째 인자를 메시지로 출력해 줍니다.
(2) 그룹
 @Test
    void groupedAssertions() {
        // In a grouped assertion all assertions are executed, and all
        // failures will be reported together.
        assertAll("person",
            () -> assertEquals("Jane", person.getFirstName()),
            () -> assertEquals("Doe", person.getLastName())
        );
    }

    @Test
    void dependentAssertions() {
        // Within a code block, if an assertion fails the
        // subsequent code in the same block will be skipped.
        assertAll("properties",
            () -> {
                String firstName = person.getFirstName();
                assertNotNull(firstName);

                // Executed only if the previous assertion is valid.
                assertAll("first name",
                    () -> assertTrue(firstName.startsWith("J")),
                    () -> assertTrue(firstName.endsWith("e"))
                );
            },
            () -> {
                // Grouped assertion, so processed independently
                // of results of first name assertions.
                String lastName = person.getLastName();
                assertNotNull(lastName);

                // Executed only if the previous assertion is valid.
                assertAll("last name",
                    () -> assertTrue(lastName.startsWith("D")),
                    () -> assertTrue(lastName.endsWith("e"))
                );
            }
        );
    }
여러 개의 assertions가 만족할 경우에만 테스를 통과하였다고 판단하고 싶을 경우에는 assertAll()을 사용하면 됩니다. 그리고 이 메소드 내에서 인자로 람다식을 사용하며, 여러 개의 람다식이 동시에 실행되는 특징을 가지고 있습니다.
(3) 예외 처리
@Test
    void exceptionTesting() {
        Exception exception = assertThrows(ArithmeticException.class, () ->
            calculator.divide(1, 0));
        assertEquals("/ by zero", exception.getMessage());
    }
특정 예외가 발생하였는지 확인하고 싶을 때는 assertThrows()를 사용합니다. 첫 번째 인자는 확인할 예외 클래스이고, 두 번째 인자는 테스트하고자하는 코드를 작성하면 됩니다.
(4) 시간 초과
@Test
    void timeoutNotExceeded() {
        // The following assertion succeeds.
        assertTimeout(ofMinutes(2), () -> {
            // Perform task that takes less than 2 minutes.
        });
    }
@Test
void timeoutExceededWithPreemptiveTermination() {
// The following assertion fails with an error message similar to:
// execution timed out after 10 ms
assertTimeoutPreemptively(ofMillis(10), () -> {
// Simulate task that takes more than 10 ms.
new CountDownLatch(1).await();
});
}
assertions가 특정 시간 안에 실행이 끝나는지 확인하고 싶을 때는 assertTimeout()이나 assertTimeoutPreemptively()을 사용합니다. 전자는 단순히 특정 시간 안에 실행이 끝나는지만 확인하지만, 후자는 특정 시간 안에 실행이 끝나지 않으면 바로 종료해 버리는 특징이 있습니다.
JUnit5의 Assumptions
Assumptions은 특정 환경에 있을 때만 테스트를 진행하도록 할 때 사용합니다.
import static org.junit.jupiter.api.Assertions.assertEquals;
import static org.junit.jupiter.api.Assumptions.assumeTrue;
import static org.junit.jupiter.api.Assumptions.assumingThat;

import example.util.Calculator;

import org.junit.jupiter.api.Test;

class AssumptionsDemo {

    private final Calculator calculator = new Calculator();

    @Test
    void testOnlyOnCiServer() {
        assumeTrue("CI".equals(System.getenv("ENV")));
        // remainder of test
    }

    @Test
    void testOnlyOnDeveloperWorkstation() {
        assumeTrue("DEV".equals(System.getenv("ENV")),
            () -> "Aborting test: not on developer workstation");
        // remainder of test
    }

    @Test
    void testInAllEnvironments() {
        assumingThat("CI".equals(System.getenv("ENV")),
            () -> {
                // perform these assertions only on the CI server
                assertEquals(2, calculator.divide(4, 2));
            });

        // perform these assertions in all environments
        assertEquals(42, calculator.multiply(6, 7));
    }

}
testOnlyOnCiServer()를 보면, assumeTrue()를 통하여 인자 비교를 합니다. 이때, assumeTrue()의 두 번째 인자로 System.getenv("ENV")을 사용하는데, 이것은 환경변수를 가져오는 메소드입니다. 이렇게 현재 환경변수를 가져오고, 이것이 CI와 같다면 테스트를 실행하는 것입니다. 이때, 유의할 점이 현재 환경이 CI가 아니면 테스트를 실패하는 것이 아니라, 해당 테스트를 건너뜁니다.
정리
지금까지 꼭 알아야 하는 JUnit5 개념을 알아 보았습니다. 시간이 된다면, 어노테이션 중에서도 자주 사용하는 어노테이션을 자세하게 다뤄보겠습니다.
출처
JUnit 5 User Guide
Although the JUnit Jupiter programming model and extension model will not support JUnit 4 features such as Rules and Runners natively, it is not expected that source code maintainers will need to update all of their existing tests, test extensions, and cus
junit.org
[JUnit5 개요] Meta 애노테이션과 Assumption, test 실행 순서에 대해
JUnit5 개요 JUnit5 User Guide Junit 공식 문서를 보며 정리해 보았다. 각 챕터 번호는 해당 공식 문서에 매칭되는 번호이다. https://junit.org/junit5/docs/current/user-guide/#overview-what-is-junit-5 1.1..
pjh3749.tistory.com
JUnit 5 알아보기
JUnit 5 알아보기 JUnit 5에 대하여 알아보도록 하겠습니다. 목차 Table of Contents JUnit 5란 ?? 이전버전의 JUnit과 다르게 JUnit 5는 세가지 하위 프로젝트의 여러 모듈로 구성됩니다 JUnit5 = JUnit Pla..
beomseok95.tistory.com
'프로그래밍 언어 > Java' 카테고리의 다른 글
| Java Collections Framework(JCF)란? - JCF의 정의와 특징 (JAVA) (0) | 2021.02.10 |
|---|---|
| AssertJ 필수 기능 정리 (JAVA) (1) | 2021.02.08 |
| Stream이란? - 최종 처리 메소드의 종류와 사용 방법 [3 - groupingBy()] (JAVA) (0) | 2021.01.10 |
| Stream이란? - 최종 처리 메소드의 종류와 사용 방법 [2 - collect()] (JAVA) (0) | 2021.01.08 |
| Stream이란? - 최종 처리 메소드의 종류와 사용 방법 [1] (JAVA) (0) | 2021.01.07 |
댓글